
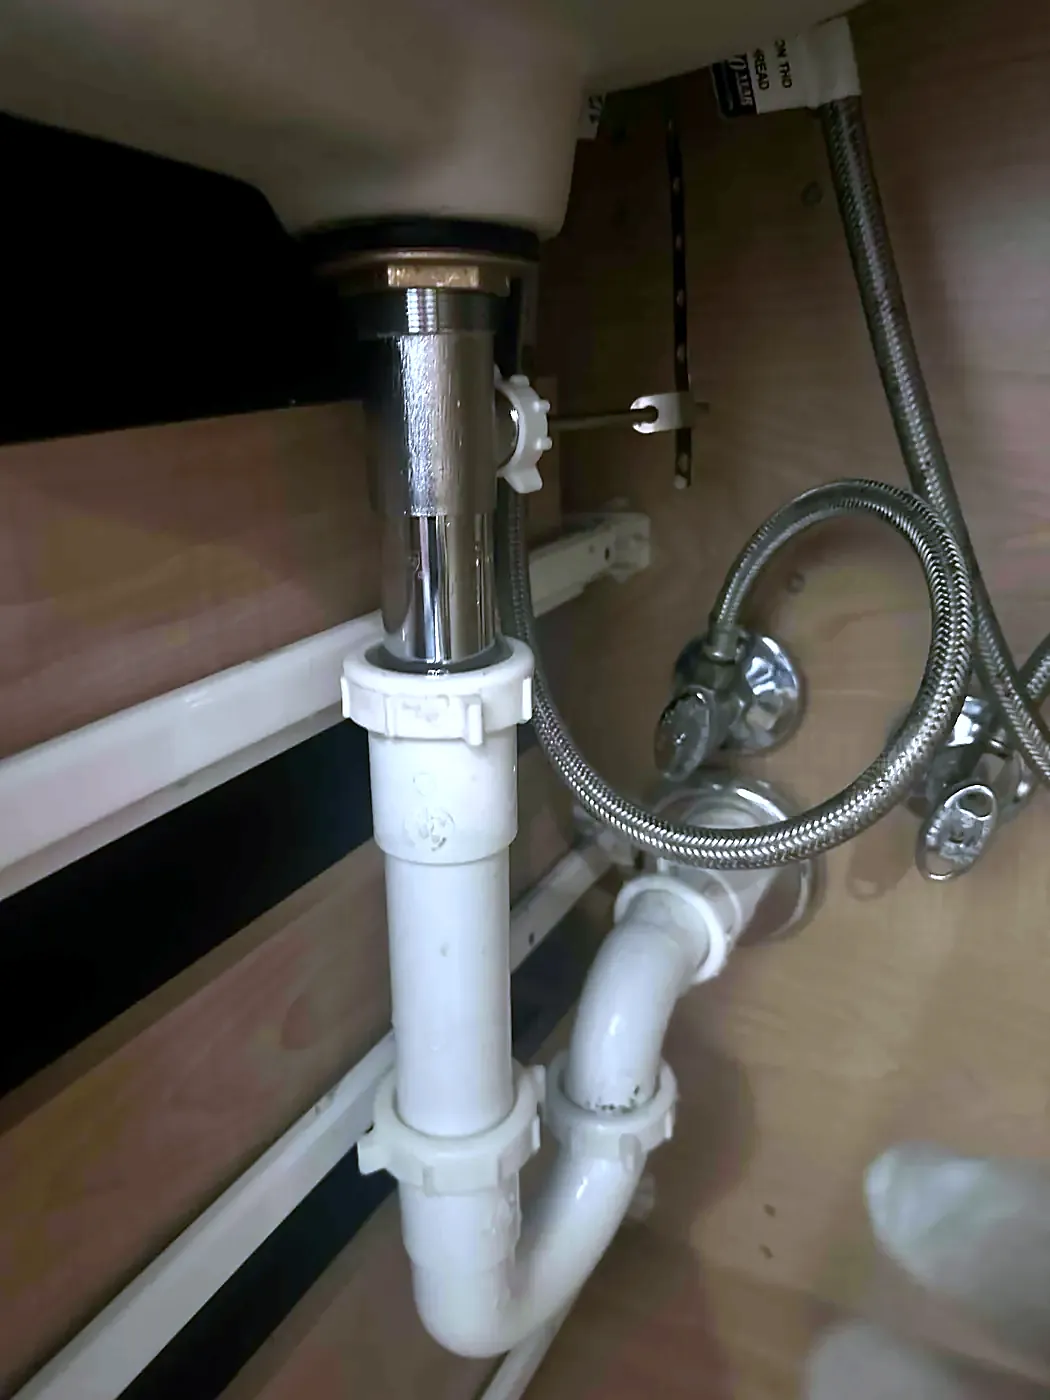
Kitchen sink calls divide into three. A line that will not drain is almost always grease loaded into the branch pipe behind the wall, often with no cleanout anywhere to reach it from. Water in the cabinet is usually a failed shut-off valve or a drain assembly that was built wrong. No water, or pressure that comes and goes, is usually the stops themselves breaking apart internally and sending debris up into the faucet. All three are diagnosed with the cabinet open and the water running.
Why a kitchen sink drains slowly or stops up completely
A kitchen branch line takes years of grease, and grease does not wash away — it cools on the pipe wall and narrows it until one ordinary evening the sink holds water. When we cable a blocked kitchen line in a Northern Virginia house the cable comes back black with grease, and it usually comes back that way twice before the line runs clear. The general approach to a failing sink is covered under sink repair and installation; this page is the kitchen side of it.
What makes the difference between a fast job and a long one is whether anyone can reach the line:
- No cleanout on the line at all. This is the single most common thing we find on a stopped-up kitchen sink, and it is why the line was allowed to block in the first place. There is nowhere to put a cable in without dismantling the piping.
- A cleanout in the wrong place. We have found the only cleanout sitting above the P-trap at the back of the cabinet, where a cable cannot be driven into the branch line at a useful angle.
- A P-trap installed backwards. It holds debris instead of passing it. We have pulled exactly that out of a cabinet on a sink that had been blocking repeatedly for years.
- Galvanized pipe. Older branch lines scale up internally until the bore is a fraction of what it should be. We cut those out and transition to PVC rather than cabling a pipe that will block again in weeks.
- Fixtures tied together improperly. On one call a basement utility sink backed up every time the kitchen sink or dishwasher ran, because a cross fitting in the wall had the air conditioner condensate, the washing machine and the kitchen discharge all landing in the same run.
Chemical drain cleaner does not clear a grease-loaded branch. We have opened cabinets to find the dishwasher standing full of waste water and caustic cleaner that had to be dealt with before a single joint could be opened. When more than one fixture is slow at the same time the problem is downstream of the kitchen altogether, which is drain cleaning rather than a sink repair.
What we find under a kitchen sink that is leaking
Under-cabinet water at a kitchen sink comes from a short list, and the list is almost never the sink bowl:
- A failed shut-off valve
- The hot, the cold, or the dual valve feeding the dishwasher. A stop that drips slowly rots the cabinet base long before anyone sees water — we have replaced cabinet bottoms that had gone through completely.
- The drain assembly
- Slip nuts backed off, a flanged tailpiece rusted through with a hole in the nut, or a trap cracked at the rim. Wrapping it in tape does not hold; we have found that repair in place.
- A loose disposal flange
- Where a disposal has been fitted without the drain flange being properly tightened, the drip appears under the unit and looks exactly like a trap leak.
- A leaking Fernco coupling
- Rubber couplings used as a permanent joint eventually weep, especially where one was used to join two dissimilar materials inside a wall.
- A dishwasher or its boot
- A failed appliance can soak a cabinet floor for weeks. We test it by running full cycles including the drain, and where the leak will not reproduce we say so rather than replacing parts on a guess.
- Nothing at the sink at all
- We have run water for several minutes, inspected the faucet, drain, waste pipe and every valve, and found no leak — while a whole-house check found a dozen stops leaking elsewhere. That is a legitimate answer.
Kitchen sink shut-off valves and why we check every one in the house
The stops under a kitchen sink work harder than any others in the house, because there are usually three or four of them: hot, cold, a dual valve feeding the dishwasher, and often a tap for a refrigerator or ice maker line.
They fail in ways that are invisible from outside. We have removed dual valves with no gasket left inside, a valve that turned out to be the wrong type for its position — one handle where it needed two — and stops that had broken apart internally while still appearing sound, with the debris traveling up and clogging the faucet. We have found seized valves that would not shut off when we needed them to, and saddle valves on refrigerator lines that should never have been there.
The cause is often upstream. On one call a gauge showed the house sitting above ninety pounds of incoming pressure: the pressure reducing valve had failed, and that high pressure had taken out the shut-off valves and the kitchen faucet together. On another, the utility shut the neighborhood water off and restored it, the pressure spiked, and the house started making noise. Gauging the incoming pressure is standard on our calls — see water pressure, PRVs and shut-off valves.
So when we are under one kitchen sink we check the rest. Finding five, eight or twelve failing stops in one house is routine, and replacing them together is far less disruptive than finding them one flood at a time.
Kitchen sink drain piping done properly
A great deal of what we are called to fix is previous work. The arrangements we find under kitchen sinks include PVC running into brass running into copper, two trap adapters in the same assembly, P-traps glued solid so they cannot be opened, a two-inch pipe reduced to an inch and a half under the sink, a trap adapter facing upward, and a drain line that steps down in size and then picks back up again.
A rebuilt assembly looks like this:
- The waste line cut back to roughly six to eight inches off the wall so there is something clean to work from.
- A cleanout installed and positioned so a cable can be driven straight into the branch line next time.
- A slip-joint P-trap and trap adapter — joints that can be opened, not glued.
- A flanged tailpiece and a threaded extension tailpiece sized to the sink, with a basket strainer at the bowl.
- Where two bowls or a disposal and a dishwasher share the line, a tee and a wye with separate P-traps so each fixture drains independently.
- The line snaked and treated before it is closed up.
Where a dishwasher discharges into the assembly, its drain line has to be looped high and anchored. We find that line lying loose on the cabinet floor more often than not, which lets waste water run back into the appliance. That is covered in more detail under dishwasher installation and hook-up.
No water or low pressure at the kitchen sink faucet
When a kitchen faucet gives nothing, or the pressure comes and goes, we work from the fixture backwards:
- Pull the spray head and flush the faucet. If the aerator or head is fouled, that is the end of it.
- Check the supply lines and confirm the stops are fully open. A deteriorated supply line collapses internally and chokes flow.
- Look inside the stops. More than once the valves have been open all the way and broken apart internally, with the debris from the valve itself clogging the faucet. The fix is to cut the stops out, tee into each line, run new copper and fit new valves.
- Identify the faucet before ordering parts. We have had kitchen faucets with no brand marking at all, where no supply house could source a cartridge. A faucet nobody can get parts for is not repairable at any price, and we say so rather than charge you to find out.
Some faucets are worth rebuilding and some are not. A cartridge swap on a known brand is a repair; a failed motion sensor, or a body leaking at the base after years of high pressure, generally is not. See kitchen faucet repair and replacement for that side of the work.
A kitchen sink that has dropped away from the countertop
Undermount kitchen sinks are held to the underside of the counter by adhesive. When that bond ages the sink drops, the seal around the rim opens, and water starts running into the cabinet — which is usually how people notice.
Resetting one is a defined job, not a squirt of sealant. We disconnect the drain piping and the disposal, clean the old adhesive off both the sink rim and the underside of the counter, dry-fit the sink to confirm it sits correctly, bed it in a waterproof epoxy or silicone-based adhesive, and add wood blocking on each side for mechanical support. The adhesive then cures the full recommended time with the sink unused before anything is reconnected. Where the cabinet wood underneath has been wet, we dry it and apply mold control before the sink goes back.
Do you need a permit for kitchen sink plumbing in Virginia?
Changing a faucet, a trap or a set of stops does not require a permit. Cutting into the copper supply, replacing waste piping, running a new refrigerator or ice maker line, adding a cleanout in the wall or replacing a pressure reducing valve does — and we pull and process those permits ourselves.
The work is performed to the Virginia building code and the county inspection is scheduled after the work completes; the job is not closed out until it passes. Permit and permit processing fees are written into the contract before anything starts. Where copper is cut, the bonding across the gap gets restored, because the metal piping in many of these houses is part of the grounding path.
Putting a kitchen sink where there was never any plumbing is a rough-in rather than a repair: hot and cold tapped from the nearest accessible lines, a waste line tied into an existing drain where the fall allows it, and a conventional vent — an air admittance vent only where code permits one.
What a kitchen sink repair visit includes
- Reproduce the symptom. Fill both bowls and release them, run the dishwasher through a drain cycle, and run the faucet long enough for an intermittent leak to show.
- Open the cabinet and inspect everything. Stops, supply lines, the drain assembly, the disposal, the dishwasher tie-in and the piping going back into the wall.
- Gauge the incoming water pressure, and check the stops at every other fixture in the house.
- Cable the line from a point where it can actually be reached, dropping the trap and the disposal for direct access where that is what it takes, and look at what comes back.
- Show you what was found, photographed where it sits inside a wall or a ceiling.
- Drain the system down, do the work, then refill and test every joint with the water running before the cabinet is closed.
If the line has been slow for months, we snake it twice and treat it rather than clearing just enough to get through the week.
What kitchen sink repair costs, and how we price it
We do not quote kitchen sink work over the phone and we do not publish numbers. Two kitchens that look the same can differ by a galvanized branch line that has to come out, a cleanout that has to be cut into a wall, stops that have to be dismantled rather than closed, a faucet nobody makes parts for, or a cabinet base that has rotted through underneath. None of that is visible from the doorway.
An estimator comes to the property, opens the cabinet, and gives you a written price for the work in front of him before anything begins.